Accessed by selecting the icon (  ) located in the menu on the left of the application.
Inbox
Breakdown of a message list element
Filtering and searching within Inbox
Inbox is the go to place in the application to respond to customers and prospects. It pulls in messages from all social channels and chat applications in one convenient place. Primarily used by Customer Service agents/advisers, and occasionally Marketers wishing to engage with customers.
Selection of the menu option on the left of the application, provides three filtering options. Selection of the appropriate option provides initial filtering of messages that are available. The three filters are Inbox, Private Messages and Archived.
Note: For the inbox to be populated with messages, Social Accounts need to be added. (See How to add a Social Account).
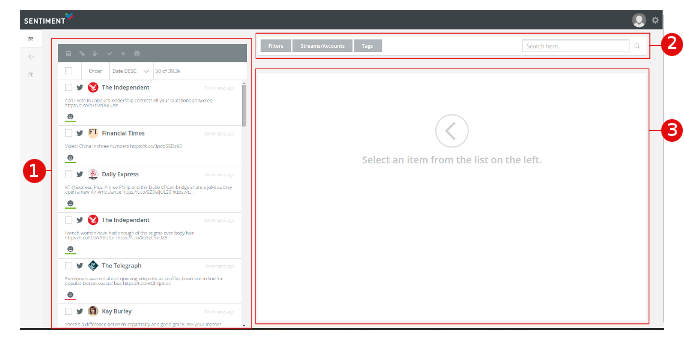
- Message list panel : Provides a summary of the messages available for processing. Above the list are the buttons used for Bulk processing and a refresh button to the rgiht, with ordering information and a count of the messages immediately below.
- Filter panel : Use of these allow specific messages to be located and the ability to filter the displayed messages. The tags option presents the list of available tags that can be added to selected messages, which can be used at another time to locate the messages and for data analysis..
- Details panel : Once a message has selected from the message list panel, it is displayed in detail in this panel, which also provides rich functionality, both general in nature and also specific to the account from which the message originated.
Breakdown of a message list element
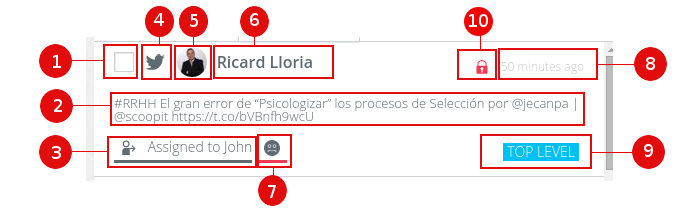
- Bulk action selector : When checked, bulk actions will affect the message.
- Snippet : Textual content of the message.
- Assignment : User that is currently assigned ownership of the message.
- Account channel : Indicates the channel from which the message originated.
- Author image : Image of the author of the message.
- Author name : Name of the author of the message.
- Sentiment icon : Indicates the sentiment of the message.
- Date/Time : Time since the message was published. If the time is more than 24 hours, then the date is also shown. Clicking on this will display a pop-up showing the history of all activities that have happened upon the mention.
- Tags : Location of any tags that have been attached to the message.
- Lock icon : If present, this indicates that the message is locked by another user. Hovering over the icon displays the user that is holding the lock.
Message Locking within Inbox
To ensure that messages are not handled concurrently by multiple users, the Application uses message locking which is visualised within the Message list panel by display of a Lock icon positioned to the left of the Date/Time of the message (See Breakdown of a message list element). This is displayed for all users with the exception of the user who has effectively 'locked' the message(s).
Note: Hovering over the Lock icon will display the name of the user that is currently working on the message.
When are messages locked ?
Messages are locked when a message is selected and displayed in the Details Panel. All messages in the same conversation are also locked, further reducing the possibility of multiple users providing a single customer the same details multiple times.
When are messages unlocked ?
Messages are currently locked until the time that the user locking the message(s) releases the lock. This can be done in a number of ways:
- User selects a different message, which populates the Details Panel.
- User navigates to a different section of the application and therefore leaves the Inbox section.
- User logs out of the application via use of the logout button.
- Lock time-out period is reached (See below).
What is the Lock time-out period ?
A Locked message is given a time-out period of one minute, after which the the user is asked to confirm that they wish to continue to lock the message. The user is required to answer this query within 30 seconds, after which the message will automatically be released. This time-out period is invoked if the user comes out of the application by closing the browser, or even if their machine crashes. In this way the application ensure that timely access to the messages are maintained.
The lock-out period has not yet been implemented
Filtering and Searching within Inbox
To search or filter contents of the message list, the Filter Panel located above the details panel can be used. This allows filtering of a wide array of categories, and also the functionality to perform a textual search of the message list.
This is most often used to view messages from a certain account, look for specific messages about a topic, or filter based on assignment or tag type.
For more information, select one of the following links:
Accessed by selecting the icon ( ) located in the menu on the left of the application, and then clicking upon the filter option Inbox.
This provides a list of all the active messages that have been captured by the application, providing a rich array of functionality for the engagement with the customers and prospects.
Message : Single element that has been captured by the application.
Conversation : Multiple related messages to from a single author.
For more information, select one of the following links:
Why do I mark a message as Completed or No Action
How to clear down messages not needing a response
The Inbox aggregates all messages across the different channels in the inbox message list, loading automatically in close to real-time. If there are no messages present either the inbox has been cleared by use of the the complete, or no action buttons, or Social Accounts have not been added to the current Workspace. (See: How to add a Social Account).
Assuming there are messages showing in the message list, select a message to view, process or reply by clicking on the authors name, or the textural content. This will populate the details panel.
How to view the authors bio, and add notes about an author
Bulk
It is not possible to view multiple author bios.
Single
- Click on the author name or textural content in the message list, which will populate the details panel with the conversation.
- Click on the author name in the message displayed in the details panel. The Author Bio panel is displayed, showing the current information on the selected author. If entry of author notes is not required, then the author panel should be closed at this point.
- Enter any pertinent information about the author intro the supplied text area on the author panel.
- Click Save to confirm update of the author information with the entered note.
The Sentiment of a message is graded automatically in English language, however as this is automatic it is possible that the Sentiment have need to be changed ( This effects Metrics ).
Bulk
- Check on each of the check-boxes of the messages that require the Sentiment to be amended. Alternatively the check-box in the header above the list can be clicked to select all messages.
- Click on the Sentiment icon (
 ) situated above the list of messages. A small pop-up will be displayed.
 - Click the required Sentiment Icon on the pop-up. Once clicked all the selected messages will have their Sentiment values updated.
Single
- Click on the Sentiment Icon of the message in the message list that requires the change in sentiment. A small pop-up is displayed. It is also possible to click on the Sentiment Icon of the message as displayed in the details list if the message has previously been selected.
- Click the required Sentiment Icon in the pop-up. Once clicked the selected message will have its Sentiment value updated.
 Negative
  Neutral Positive
To use tagging, a tagging structure must be set up. (See: How to add a Tag). Tags are used to categorise messages as they are captured by the application, or can be categorised during processing by a user, Tag structures can be used based on issue type, location or other company wide reporting objectives. Tag reports can be seen within Metrics Performance, and allows visibility as to the types of messages that are present with the customers.
Bulk
- Check on each of the check-boxes of the messages to be tagged
- Click on the Tag icon (
 ) situated above the list of messages. A pop-up will be displayed.
 - Select the tag(s) to be added to the messages from the provided list.
- Click Save to confirm.
Single
- Click on the author name or textural content in the message list, which will populate the details panel with the conversation.
- Click on the Tags button located at the top of the details panel. A list of tags is displayed.
- Select the tag(s) to be added to the messages from the provided list.
- Click Apply to confirm.
To use this function there must be more than one agent set up in the Application (See: How to add a User).
A user may be assigned responsibility for a message automatically by performing an activity upon a message that has not got an assigned user, via an Automation ( See Automation's ), or manually. A user is normally assigned a message by another user because the user may be supervising workload manually, or the user requires assistance with a message, or because another user is better equipped in processing the message. Whatever the reason for manual assignment, the process is as below.
Bulk
- Check on each of the check-boxes of the messages to be assigned.
- Click on the assignment icon (
 ) situated above the message list. A pop-up will be displayed.
 - Select the user to whom the message(s) are to be assigned from the provided list.
- Optionally enter any notes in the provided text area.
- Click Assign to complete the assignment.
Single
- Click on the author name or textural content in the message list, which will populate the details panel with the conversation.
- Click on the Assignment Icon ( ) located at the bottom of the displayed message. To the right of the message may be the name of the user who is currently assigned. A pop-up is displayed.
- Select the user to whom the message is to be assigned from the provided list.
- Optionally enter any notes in the provided text area.
- Click Assign to complete the assignment.
The reply function is really the critical function of the inbox, allowing for response to customer / prospects activities within the Social Accounts.
Bulk
It is not possible to add a reply to multiple messages.
Single
- Click on the author name or textural content in the message list, which will populate the details panel with the conversation
- Ensure that the Reply tab is selected in the panel at the bottom of the page.
- To the right of the Reply tab there is a drop-down list of social accounts from which the reply will originate. Ensure that the correct social account is visible. If not, click on the drop-down list and select the appropriate social account from the list presented.
- Enter the response in the text area just below the Reply tab.
- Click the Reply button.
The reply will normally be sent immediately from the social account shown in the drop down list. The exception to this is when the user creating the reply requires Approval. ( See Approvals ).
Internal notes are never seen outside the application, by customers or prospects. They are used most often when a message needs to be assigned to another user and important information needs to be passed onto them.
Bulk
- Check on each of the check-boxes of the messages that require the internal note to be added. Alternatively the check-box in the header above the list can be clicked to select all messages.
- Click on the Add Note icon (
 ) situated above the list of messages. A pop-up will be displayed.
 - In the displayed pop-up, enter the text to be added.
- Click Save to add the text as an internal note to all selected messages.
Single
- Click on the author name or textural content in the message list, which will populate the details panel with the conversation.
- At the bottom of the details panel, ensure Add Note is selected.
- Enter the text to be added into the text area at the bottom of the details panel.
- Click Submit to add the text as an internal note to the selected message.
Why do I mark a message as Completed or No Action
To keep the Inbox clear of messages that no longer require any interaction from the users, messages are archived. This is achieved by marking the message with one of two possible statuses. The statuses are described here with their general meaning.
It should be noted that these distinctions are as a guide only, as the user may archive a message by either of the options available. Below is an example to illustrate this:
Example: A user has reached out the the author to discover that the issue was now resolved. Following the guide provided, this message could be marked as Completed as interaction was made, however as the interaction was not really required, the message could also be marked as No Action.
As can be seen in the example above, the choice is not always as clear as first imaged. It is recommended that a decision is made on this and this is applied by all users of the application.
How to clear down messages not needing a response
Although a large percentage of messages need immediate response, there is also an even greater percentage that do not need a response. These could be spam messages, non relevant posts, duplicates, or marketing messages.
To keep the inbox clear so that important messages can be replied to quickly and efficiently it is best to Archive these messages as soon as possible. Enterprise accounts can use the automation functionality to clear many of these messages down without manual interaction. ( See Automation's ).
Bulk
- Check on each of the check-boxes of the messages to be marked No Action.
- Click on the No Action icon (
 ) situated above the list of messages. A pop-up will be displayed.
 - Enter any accompanying notes into the text area field on the pop-up.
- Click Save to confirm.
Single
- Click on the author name or textural content in the message list, which will populate the details panel with the conversation.
- Enter any accompanying notes into the text area field located at the bottom of the details panel.
- Click the No Action + Archive button.
Archived messages are still stored in the application and may be reviewed at any time by selection of the Archive option in the menu positioned on the left of the application, however by removing them, it keeps the inbox as clear as possible.
Once interacting with a message has completely finished, the message should be Completed. This moves the message to the Archive view. The aim of completing, is to keep the inbox clear, only displaying messages requiring action. The Complete function should be used when a message has been interacted with, and the Complete-no action function should be used when no interaction is required.
Bulk
- Check on each of the check-boxes of the messages to be completed
- Click on the Complete icon (
 ) situated above the list of messages. A pop-up will be displayed.
 - Enter any accompanying notes into the text area field on the pop-up.
- Click Save to confirm.
Single
- Click on the author name or textural content in the message list, which will populate the details panel with the conversation.
- Enter any accompanying notes into the text area field located at the bottom of the details panel.
- Click the Complete + Archive button.
This should always be done following other interactions as it is the last step to complete the process and clear down the message list.
Accessed by selecting the icon ( ) located in the menu on the left of the application, and then clicking upon the option Private Messages.
This is visually the same as the Inbox Filter, and has the same rich filtering and searching functionality via the Filter panel. There is a significant difference in the contents of the Message list panel in that is only contains a list of the private messages. As with the Inbox filter, selection of a single message is still possible, which populates the Detail's panel located to the right of the message list panel.
All the functionality of the Inbox Filter is available with this filter active.
Accessed by selecting the icon ( ) located in the menu on the left of the application, and then clicking upon the option Archived.
This is visually the same as the Inbox Filter, and has the same rich filtering and searching functionality via the Filter panel. There is a significant difference in the contents of the Message list panel in that is only contains a list of the messages that have been marked with the status of Completed or No Action. As with the Inbox filter, selection of a single message is still possible, which populates the Detail's panel located to the right of the message list panel.
A selected message visualises all the same information as in the Inbox filter, however the ability to update the presented information no longer possible. If further interaction with the message is required, then the message should be reopened (See below).
Once a message has been archived it is deemed by the application to be closed for further activity, as so no information updating capabilities are enabled. In the normal run of things this is perfectly reasonable, however sometimes a situation arises where further actions are required upon an archived message. To facilitate this need, the application provides the ability to reopen the message, which will returning to the messages list provided by the Inbox fiflter. The user must provide a user who will take ownership of the reopened message.
How to reopen a message
- Click on the author name or textural content in the message list, which will populate the details panel with the conversation.
- Click on the reopen button located in the bottom right of the details panel; A pop-up is displayed.
- Select the user to whom the message is to be assigned from the provided list.
- Optionally enter any notes in the provided text area.
- Click Assign to complete the assignment.
Comments